
How to install Caffe on Mac OS X 10.10 for dummies (like me)
Update: The instruction is also available in Chinese. I’d like to thank panovr for providing Chinese translation. (http://ylzhao.blogspot.com/2015/04/mac-os-x-1010caffe.html)
The following is a step-by-step guide for installing Caffe on Mac OS X (Tested with OS X Yosemite 10.10.3, mid-2014 rMBP with 2.8 GHz Intel Core i7, NVIDIA GeForce GT 750M 2048 MB)
For the past couple of days, I struggled to get Caffe to work on my macbook. Caffe is a deep learning framework from Berkeley and you can read more about it at http://caffe.berkeleyvision.org/. If you are reading this, you probably have noticed you have to get dependencies setup correctly and download libraries and toolkits from several places or compilation will fail. Install documentation on the website was a bit out-dated, incomplete, and somewhat convoluted. So, I’ve decided to share my success story, and for simplicity’s sake, I made it into a step-by-step guide on how to install Caffe on Mac OS X. For the maximal computing performance, I made use of my fancy NVIDIA GPU and took advantage of NVIDA’s cuDNN GPU-accelerated library.
Now, take a deep breath..
Homebrew
Install package manager for OSX called Homebrew
Anaconda Python
Download and install Anaconda Python (includes hdf5, which is used by Caffe)
https://store.continuum.io/cshop/anaconda/
Set PATH
export PATH=~/anaconda/bin:$PATH
CUDA
Install CUDA 7.0 (for OSX)
https://developer.nvidia.com/cuda-downloads
Install latest standalone CUDA driver (apparently, one included in CUDA Toolkit is outdated)
http://www.nvidia.com/object/mac-driver-archive.html
Set PATH
export PATH=/Developer/NVIDIA/CUDA-7.0/bin:$PATH
Set DYLD_LIBRARY_PATH
export DYLD_LIBRARY_PATH=/Developer/NVIDIA/CUDA-7.0/lib:$DYLD_LIBRARY_PATH
BLAS - Intel MKL
OSX native BLAS library has some instability issue. Alternatively, install Intel MKL (math kernal library, which is a component of Intel Parallel Studio XE Composer Edition) using free student license, https://software.intel.com/en-us/qualify-for-free-software/student (Later, don’t forget to set BLAS := mkl in Makefile.config)
Make sure to select every components in Intel Parallel Studio XE (honestly, I don’t know what’s used and what’s not, but apparently default installation was missing some components)
cd /opt/intel/mkl/lib/

sudo ln -s . /opt/intel/mkl/lib/intel64
cuDNN
Install NVIDIA cuDNN from https://developer.nvidia.com/cudnn (Later, don’t forget to uncomment the USE_CUDNN := 1 flag in Makefile.config). You first need to signup and get approved by NVIDIA CUDA Register Developer Program.
tar -xzvf cudnn-6.5-osx-v2.tgz

cd cudnn-6.5-osx-v2

sudo cp lib* /usr/local/cuda/lib

sudo cp cudnn.h /usr/local/cuda/include/
Dependencies via homebrew
First, we need to modify something..
brew edit opencv
Replace the following lines
args << "-DPYTHON#{py_ver}_LIBRARY=#{py_lib}/libpython2.7.#{dylib}"
args << "-DPYTHON#{py_ver}_INCLUDE_DIR=#{py_prefix}/include/python2.7"
with
args << "-DPYTHON_LIBRARY=#{py_prefix}/lib/libpython2.7.dylib"
args << "-DPYTHON_INCLUDE_DIR=#{py_prefix}/include/python2.7"
then
brew install --fresh -vd snappy leveldb gflags glog szip lmdb homebrew/science/opencv

brew install --build-from-source --with-python --fresh -vd protobuf
brew install --build-from-source --fresh -vd boost boost-python
Download Caffe from GitHub
From your home directory or any directory you want to download caffe
git clone https://github.com/BVLC/caffe.git

cd caffe

cp Makefile.config.example Makefile.config
Makefile.config
Open Makefile.config file and edit the following:
BLAS := mkl
Uncomment CUDNN to enable GPU support
USE_CUDNN := 1
Check your Python path
Read through each line carefully and modify configuration to suit your need!!!
Environment variables
Set following environmental variables:
export DYLD_FALLBACK_LIBRARY_PATH=/usr/local/cuda/lib:$HOME/anaconda/lib:/usr/local/lib:/usr/lib:/opt/intel/composer_xe_2015.2.132/compiler/lib:/opt/intel/composer_xe_2015.2.132/mkl/lib
Let’s make Caffe
Make and test
make clean

make all -j8

make test

make runtest
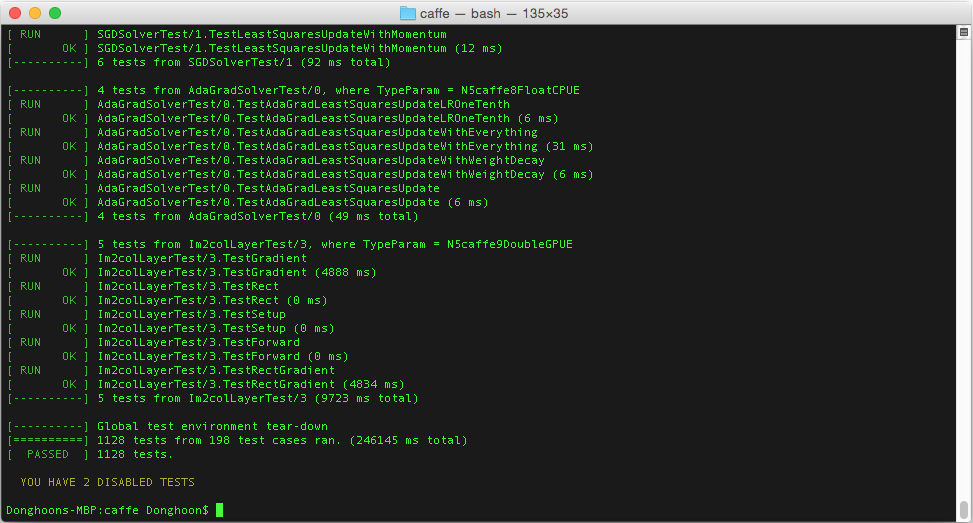
You should get a message like the following. You can safely ignore disabled tests.
[----------] Global test environment tear-down
[==========] 1128 tests from 198 test cases ran. (282609 ms total)
[  PASSED  ] 1128 tests.

YOU HAVE 2 DISABLED TESTS
Now make pycaffe and distribute.
  make pycaffe

  make distribute
Enjoy!
(Last updated: 05/04/2016)
Note 1: CUDA 6 the 32-bit and 64-bit library files were merged under /usr/local/cuda/lib
Note 2: To run CUDA applications in console mode on MacBook Pro with both an integrated GPU and a discrete GPU, use the following settings before dropping to console mode: Uncheck System Preferences > Energy Saver > Automatic Graphic Switch
Note 3: You might need the following environment variables for Intel MKL. I didn’t needed.
export MKLROOT=/opt/intel/composer_xe_2015.2.132/mkl
export DYLD_LIBRARY_PATH=/opt/intel/composer_xe_2015.2.132/compiler/lib:/opt/intel/composer_xe_2015.2.132/mkl/lib:$DYLD_LIBRARY_PATH
export LIBRARY_PATH=/opt/intel/composer_xe_2015.2.132/compiler/lib:/opt/intel/composer_xe_2015.2.132/mkl/lib:$LIBRARY_PATH
export NLSPATH=/opt/intel/composer_xe_2015.2.132/mkl/lib/locale/%l_%t/%N:$NLSPATH
export MANPATH=/opt/intel/composer_xe_2015.2.132/man/en_US:/usr/local/share/man:/usr/share/man:/opt/intel/man:$MANPATH
export INCLUDE=/opt/intel/composer_xe_2015.0.077/mkl/include:$INCLUDE
export CPATH=/opt/intel/composer_xe_2015.2.132/mkl/include:/opt/intel/composer_xe_2015.2.132/mkl/bin/intel64/mklvars_intel64.sh:$CPATH
References:
- http://caffe.berkeleyvision.org/installation.html
- http://docs.nvidia.com/cuda/cuda-getting-started-guide-for-mac-os-x/
- https://github.com/BVLC/caffe/wiki/Installation-%28OSX%29
- https://aisgit.informatik.uni-freiburg.de/zhang/caffe_future/blob/ais-master/docs/installation.md
- https://haduonght.wordpress.com/2015/02/21/install-caffe-on-mac-os-x-10-10/
- http://smrmkt.hatenablog.jp/entry/2015/02/11/195213
permalink: /2015/04/03/how-to-install-caffe-on-mac-os-x-10-10-for-dummies-like-me/
Leave a Comment